
equipment required

irwino VR training modules require specific hardware to operate.
Virtual reality headset, laptop, wifi router, here's a link to our recommendations for an optimal experience.
Installation du casque Meta Quest 3
Suivez la procédure ci-dessous pour créer un compte Meta et l’activer en tant que développeur.
Le mode développeur vous permettra d’accéder à des options nécessaires pour le bon fonctionnement de FIRE AR.

Things not going according to plan?
The headset does not appear in the list of nearby devices on the phone
Connect it to the Internet and restart it.
Check again if it appears in the list or if it requests an association code from meta.
If so, you can reconnect it to your account via this link : meta.com/device making sure you are logged in to the meta account you wish to associate with the headset.
If not, you can reset it by following this procedure: www.irwino.com/espace-formateurs/support-technique/#Reset
Then simply reconnect it to your phone and activate developer mode.
Le casque n'est pas détecté par l'ordinateur quand il est branché par USB
Check that you have activated developer mode on the headset.
If you have an external battery on the back of the headset, make sure you connect the computer to the front of the headset and not to the back at the tightening knob.
Réglages du casque Meta Quest 3
Paramétrez votre casque Meta Quest en fonction de vos applications irwino
Suivi des mains, mirrorring, mise en veille, etc.

Connecting Meta Quest headset to Wi-Fi router
(Only for FIRE VR and SST VR)


- Once the router is plugged in and the "5G network" LED is lit, connect your Meta Quest headset to the 5G Wi-Fi network.
- Connect your headset via Wi-Fi, from your headset's main menu:
- Click on "Quick settings" in the bottom menu
- Click on "Wi-Fi
- Select the router's network and enter the password (by default, the one on the bottom of the router).
Activate hand tracking
You can follow this video to activate hand tracking:

Display your Meta Quest menu

Access the settings menu in the top right-hand corner.

Select "Hands and joysticks

Finally, activate hand tracking.
A tutorial will guide you through the first activation.
You can now install an Irwino application!
The irwino application

The irwino application is a free, intuitive software package that enables trainers to easily manage the installation of training modules and their updates.
With just a few clicks, the software lets you configure your headsets and training modules, quickly install updates and set up your user details.
Installing the application on your computer
Check that you have at least 3 GB of storage on disk C.
Download the Irwino application:
Click on the "LauncherIrwino_Installer.exe" file to begin installation.

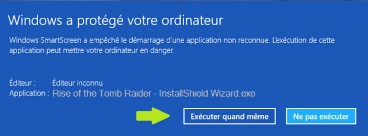
Your computer may then display this message.
Don't worry, Irwino is safe for your computer.
Simply continue by clicking on
" Further information "then on " Execute anyway ".
The installation program launches: follow the installer steps.
You can now launch your Irwino application manager.
Click on the "LauncherIrwino_Installer.exe" file to begin installation.
Your computer may then display this message.
Don't worry, Irwino is safe for your computer.
Simply continue by clicking on
" Further information "then on " Execute anyway ".
The installation program launches: follow the installer steps.
You can now launch your Irwino application manager.
Things not going according to plan?
Application does not launch
Depending on your antivirus settings, you may need to add an exception for the launcher.
With Avast, you can follow this procedure: https://support.avast.com/fr-fr/article/Antivirus-scan-exclusions/
and make an exception for the following files:
C:\ProgramDataLauncher_4D_Ressources_JAVAFX
C:\UsersNameDocumentsIrwino
If this doesn't work, try reinstalling the launcher or deactivating your antivirus software to see if that's where the problem lies.
J'ai un message "raccourci supprimé" !
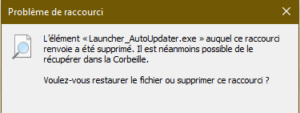
Check that files relating to the application and its modules are not blocked or quarantined.
If so, you can set up an exception for the following folders:
C:\ProgramDataLauncher_4D_Ressources_JAVAFX
My Documents
If the problem is not linked to the antivirus program, re-launch the irwino application installer. to repair the installation. (no need to uninstall the software)
Wi-Fi router installation
(Only for FIRE VR and SST VR)
- All you have to do is connect power supply your router and wait 1 to 2 minutes start up and activate WiFi
- Then connect your computer to the 5G router network (by default, the password is located under the router)
Note: Irwino applications are designed to work offline. If you don't have Internet access, don't worry: the router allows you to create a Wi-Fi network.

Asus RT-N12E router
Routers are automatically configured to broadcast wifi on available frequencies. This corresponds to the frequencies that are least used by the surrounding networks. The Quest headset may have difficulty detecting wifi on certain frequencies.
Resetting the router will not solve the problem, as it will appear depending on the other WiFi networks present when the router is switched on.
Steps to set up your router
You need to connect to the router's configuration address. Make sure that :
- the router is lit
- the computer is connected to the router by wifi or cable
then go to the following page: http://router.asus.com
Step 1
If this is your first connectionyour router will request a configuration. Select Manual config at step 1.
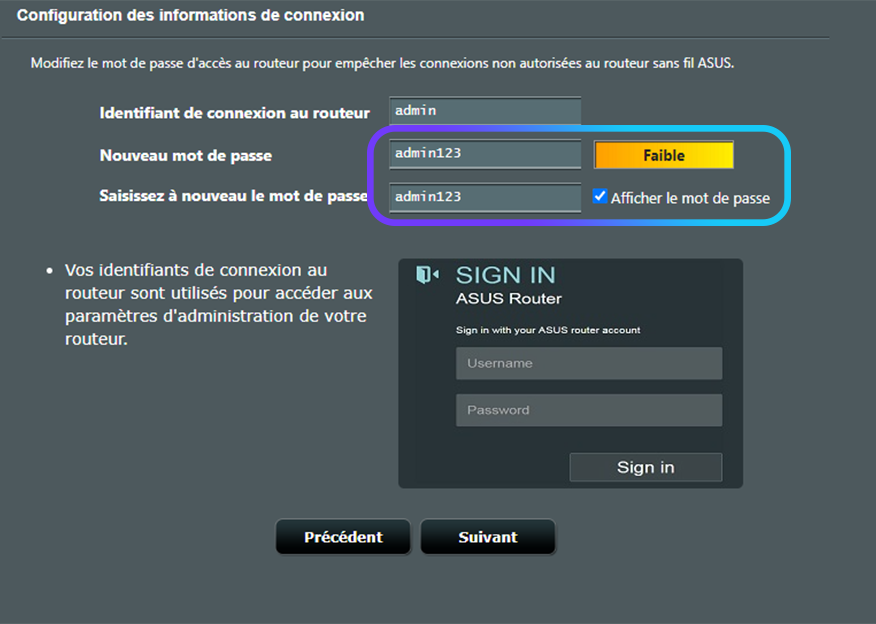
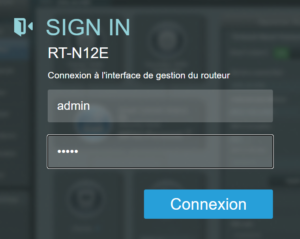
If this is not your first connection, the login / mdp will be: admin / admin123. You can go directly to step 8.
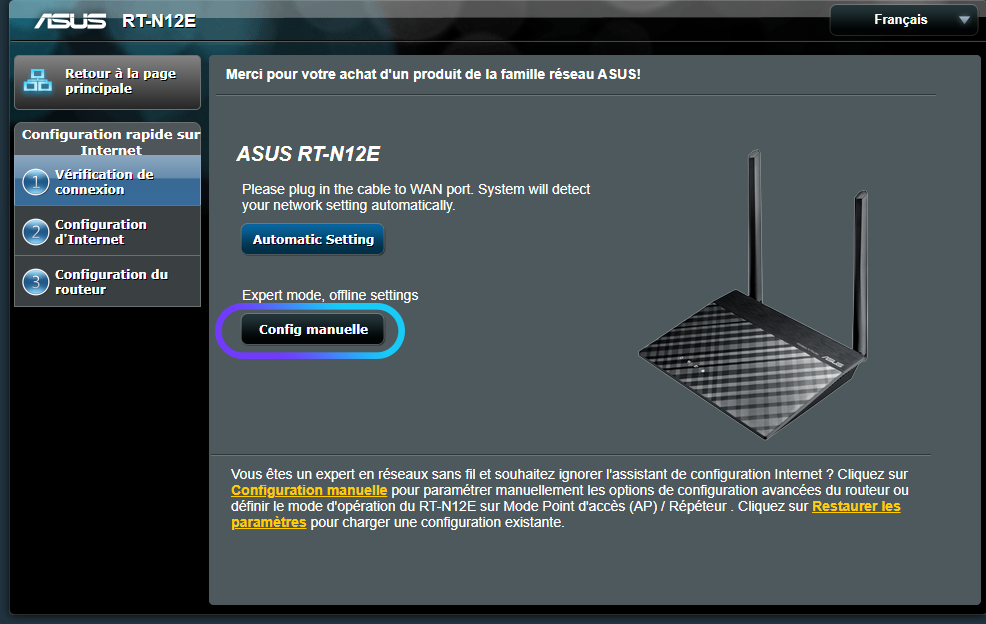
Then set a new password. This corresponds to the router's administration interface and not to the wifi connection identifiers. Then click Next.
Then select the " Wireless router" .
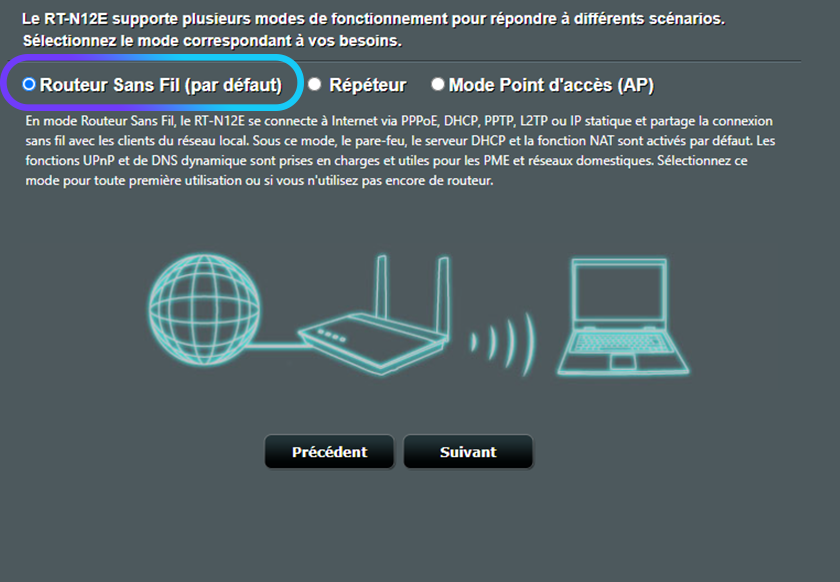
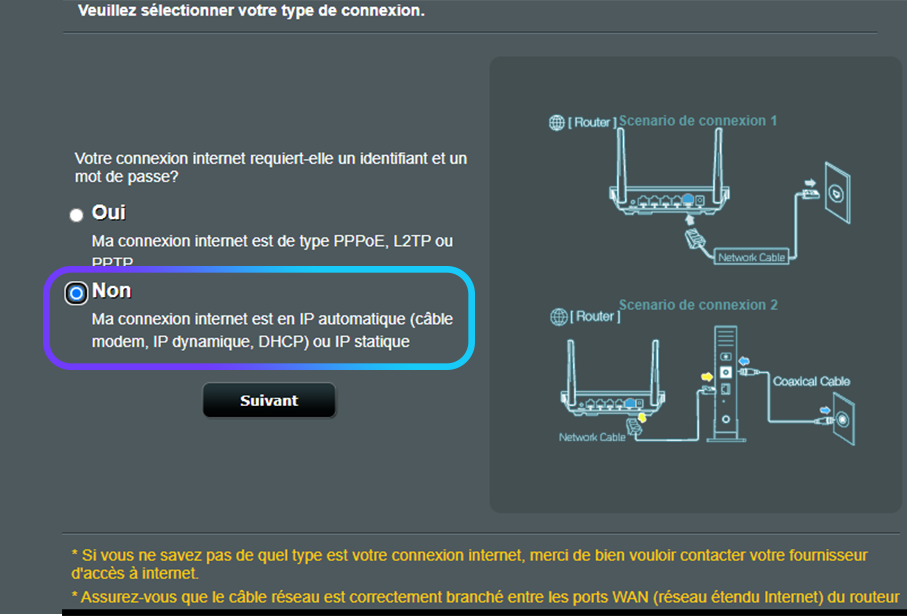
Step 2
Then select " No "To indicate that no login is required.
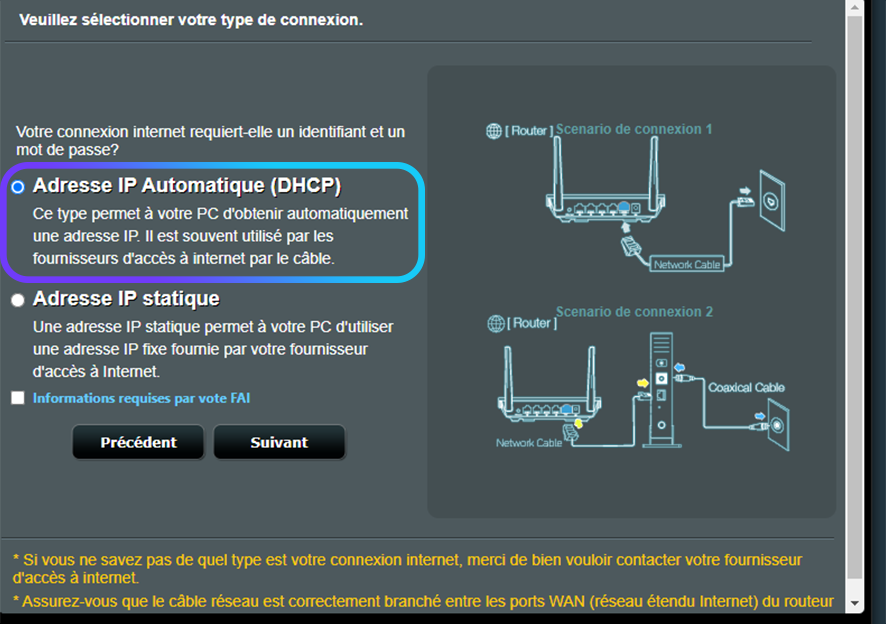
Then select Automatic IP address.
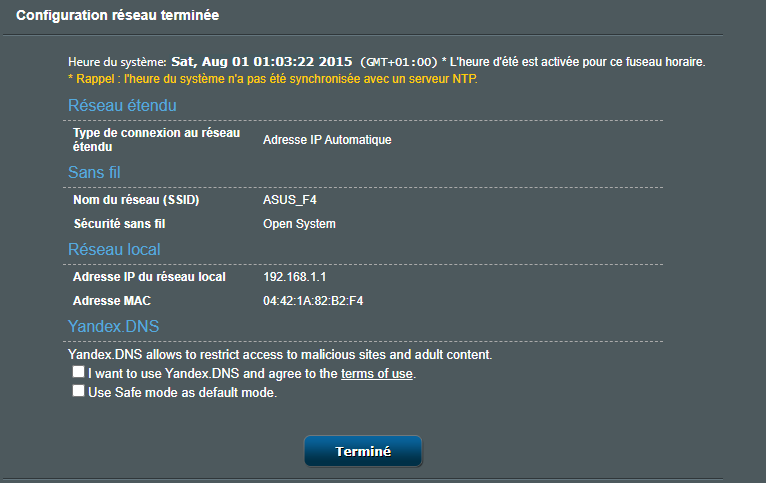
Finally, you'll be asked to enter the Wifi network name and password. The password can be left blank.
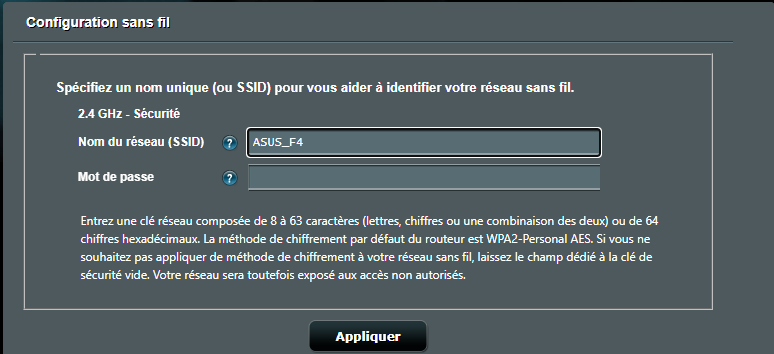
Finally, click on completed.
Step 3
Once you've refreshed the page, if you come to this window, the password corresponds to the one entered in step 2 of configuration (see beginning of this section).
On the configuration interface, select "wireless".
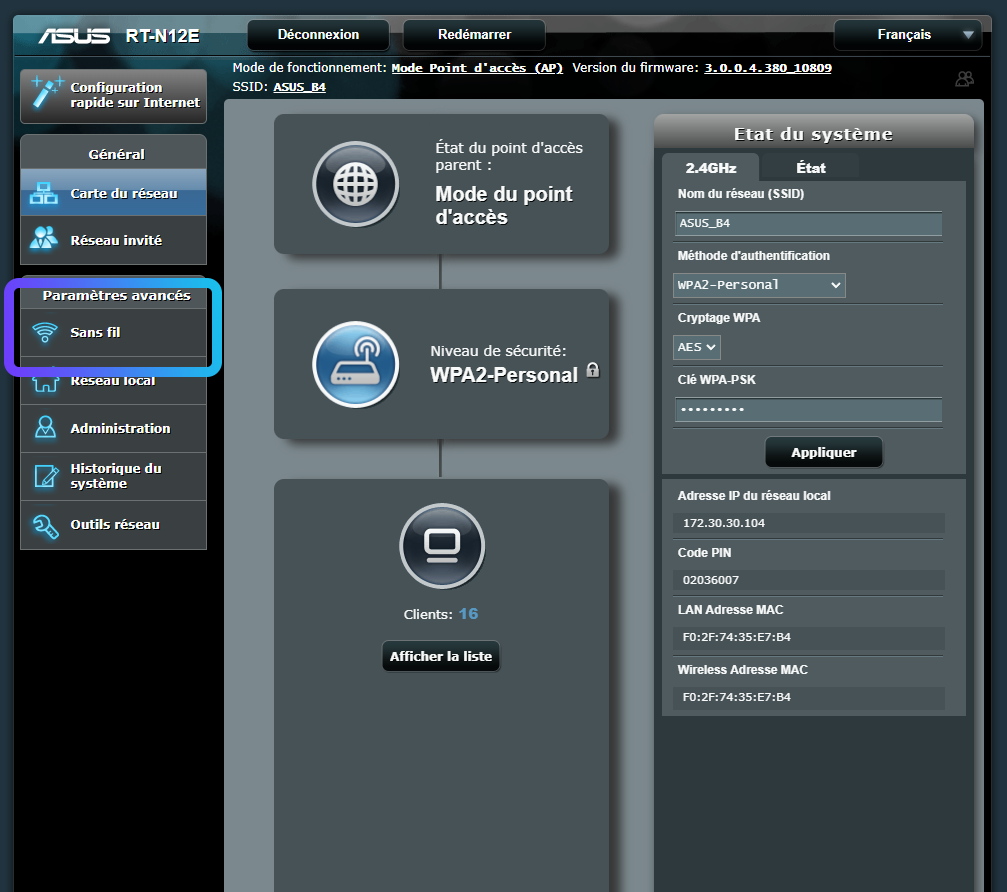
Set the channel on 10 and apply. Other settings can be left as default.

The headset should be able to detect the wifi network.
then set the channel on 10 and apply. Other settings can be left as default.
The headset should now be able to detect the wifi network.
Note: if you choose to connect your computer to the network by cable, we recommend that you disable the computer's Wi-Fi to ensure that it uses the router's network.
Stabilize the connection between headset and computer
This video describes the settings to be made and general best practices for optimizing the connection between headset and computer.
A technical question? Getting stuck?

Besoin d'une réponse rapide ? Posez votre question à Irvinia, notre attachée d'assistance IA !

Pour toute autre demande, n'hésitez pas à contact our support team.
Elle est à votre service les jours ouvrés de 8h30 à 13h et de 14h à 17h00.